If you’re trying to figure out how to fix high latency on Windows 11, you’re likely dealing with sluggish online games, delayed keystrokes in remote sessions, or video calls that freeze mid-sentence. The frustrating part is that your internet speed test might look perfectly fine — yet everything still feels slow. That disconnect between speed and responsiveness is exactly what latency problems look like.
This guide breaks down the real causes behind high latency on Windows 11, shows you how to diagnose the problem accurately, and walks through both quick and advanced fixes — step by step.
What is Latency and Why It Happens on Windows 11
Latency is the time it takes for a data packet to travel from your computer to a remote server and back. It’s measured in milliseconds (ms) and commonly referred to as “ping.” When you click something in an online game and there’s a noticeable delay before the action registers, that delay is latency. A ping of 10–30ms feels instant. Once it crosses 80–100ms, the lag becomes noticeable. Above 150ms, most real-time applications — gaming, voice calls, video conferencing — start breaking down.
What confuses most people is that latency and speed are not the same thing. You can have a 500 Mbps connection and still suffer from 200ms ping. Download speed measures how much data your connection can move per second. Latency measures how quickly that data begins arriving. Think of speed as the width of a highway and latency as the time it takes a car to reach the destination. A wider highway doesn’t help if the route is congested or indirect.
On Windows 11 specifically, several OS-level factors can introduce or worsen latency. The operating system runs background processes — Windows Update, OneDrive sync, telemetry services — that generate network traffic without your input. Wi-Fi power management settings, which Windows 11 enables by default to save battery, can throttle your adapter’s responsiveness. Outdated or generic network drivers, especially after a major Windows update, are another common culprit. DPC (Deferred Procedure Call) latency, an internal processing delay within Windows, can also cause ping spikes even when your network connection itself is stable.
Beyond the OS, your local network setup plays a significant role. Router placement, channel congestion on Wi-Fi, bufferbloat during heavy traffic, and even the type of Ethernet cable you use can all add milliseconds to your round-trip time. High latency is rarely caused by a single factor — it’s usually a stack of small issues compounding together. That is also why high jitter often accompanies latency problems, since both stem from similar network instabilities.
The sections ahead focus on measuring your latency accurately first, then isolating and fixing each possible cause.
How to Check Latency on Windows 11 (Ping Test + Pathping)
Before changing any settings, you need a clear picture of your current latency — not just a single number, but a pattern. A one-time ping tells you very little. What matters is consistency over time and knowing exactly where in the network path the delay originates. Windows 11 includes two built-in command-line tools that handle both of these tasks without needing any third-party software.
To open Command Prompt, press Windows + S, type cmd, and select Run as administrator.
Continuous Ping Test for Latency
A standard ping command sends four packets and stops. That’s not enough data to catch intermittent spikes. To run a continuous ping that keeps sending packets until you manually stop it, use the -t flag:
ping -t google.comThis sends a ping request to Google’s server every second and displays the round-trip time for each packet. Let it run for at least 60–90 seconds while your network is under normal use. Watch for two things: the average latency and any sudden spikes. If most replies come back at 20ms but every few seconds you see one jump to 300ms or higher, that pattern points to intermittent congestion or Wi-Fi instability rather than a constant problem.
Press Ctrl + C to stop the test. Windows will print a summary showing minimum, maximum, and average round-trip times, along with the packet loss percentage. For a deeper breakdown of how to read these results and use ping effectively, see this guide on using the ping command for internet troubleshooting.
Use Pathping to Find Where Latency Starts
The continuous ping test confirms that latency exists, but it doesn’t tell you where in the network it’s happening. That’s where pathping comes in. This command combines a traceroute with sustained packet-loss measurement at every hop between your PC and the destination:
pathping google.comOnce you run this, the tool first traces the route — listing every router and gateway your packets pass through. Then it spends approximately 250 seconds (roughly four minutes) measuring packet loss and latency at each hop. Don’t interrupt it during this phase; the longer measurement window is what makes pathping more accurate than a basic traceroute.
The output shows each hop numbered sequentially. Hop 0 is your own machine. Hop 1 is typically your router. The remaining hops are ISP and backbone nodes leading to the destination server.
What Do the Results Mean?
Focus on two columns in the pathping results: the RTT (round-trip time) and the Lost/Sent percentage at each hop.
- High latency at Hop 1 (your router): The problem is local — your home network, Wi-Fi signal, or router itself is adding delay. This is the most fixable scenario.
- High latency appearing at Hop 2 or 3: These are usually your ISP’s first nodes. Consistent delay here suggests ISP-side congestion, especially during peak hours.
- High latency only at the final hop: The destination server itself is slow or overloaded. This is outside your control.
- Packet loss at any hop: Even 2–3% packet loss causes noticeable lag. If you see loss alongside latency, that combination is often behind the worst gaming and call quality issues. You can troubleshoot that separately with a focused guide on fixing packet loss on Windows 11.
You can also cross-reference your Command Prompt findings with a browser-based tool. The Cloudflare Speed Test measures latency, jitter, and download/upload in one run — useful for getting a quick visual overview alongside your command-line data.
Once you know where the latency originates, you can target your fix accurately instead of guessing.
8 Common Causes of High Latency on Windows 11
Now that you know how to measure latency and pinpoint where delays occur, the next step is understanding what causes those delays in the first place. High latency on Windows 11 rarely comes from a single source. In most cases, two or three of the following factors overlap — and fixing just one can make a noticeable difference.
1. Wi-Fi Signal Weakness or Interference
Wi-Fi is the most common source of latency in home networks. Walls, floors, distance from the router, and interference from neighboring networks all degrade signal quality. Windows 11 may show full signal bars while the actual connection quality is poor — signal strength and signal quality are not the same metric. On congested 2.4 GHz bands especially, latency can spike unpredictably. This is a key reason why Wi-Fi ping is almost always higher than Ethernet on the same router.
2. Background Network Activity
Windows Update downloads, OneDrive file syncing, Microsoft Store app updates, and telemetry uploads all consume bandwidth silently. When these processes run during a game or a video call, they compete for the same connection — pushing your latency higher without any visible warning.
3. Bufferbloat
Bufferbloat happens when your router buffers too much data during heavy traffic, creating artificial queuing delays. It’s one of the most overlooked causes of latency spikes during downloads or streaming. You can test for it directly using the Waveform Bufferbloat Test, which grades your connection under load.
4. Outdated or Generic Network Drivers
After major Windows 11 updates, the OS sometimes replaces manufacturer-specific network drivers with generic Microsoft versions. These generic drivers often lack performance optimizations, leading to increased latency and inconsistent connection behavior.
5. Wi-Fi Power Management
Windows 11 enables power-saving mode on Wi-Fi adapters by default. This setting allows the OS to reduce power to the adapter during low-activity periods, which introduces micro-delays when the adapter has to “wake up” for incoming packets.
6. DNS Server Response Time
Every time your system resolves a domain name, it queries a DNS server. If your ISP’s default DNS server is slow or overloaded, each resolution adds latency — sometimes 50–100ms per lookup, which stacks up fast during browsing and gaming.
7. Router-Level Issues
Aging router firmware, overloaded NAT tables, or routers running at capacity with too many connected devices can all introduce per-packet delays. Routers that haven’t been restarted in weeks accumulate memory leaks and stale connection entries that quietly degrade performance.
8. DPC Latency (System-Level Delay)
Deferred Procedure Call latency is an internal Windows processing delay caused by poorly optimized drivers or hardware conflicts. DPC latency doesn’t show up in ping tests — it manifests as audio glitches, mouse stuttering, and frame drops alongside network lag. Microsoft’s network diagnostics documentation covers how system-level delays interact with network performance in more detail.
With these causes identified, the next sections walk through targeted fixes — starting with the simplest changes that deliver the biggest improvement.
Quick Fixes That Work for Most Users
The fixes in this section address the most common causes of high latency on Windows 11 and require no advanced technical knowledge. Each one targets a specific issue identified in the previous section. Start from the top — the first fix alone resolves latency problems for a large percentage of users.
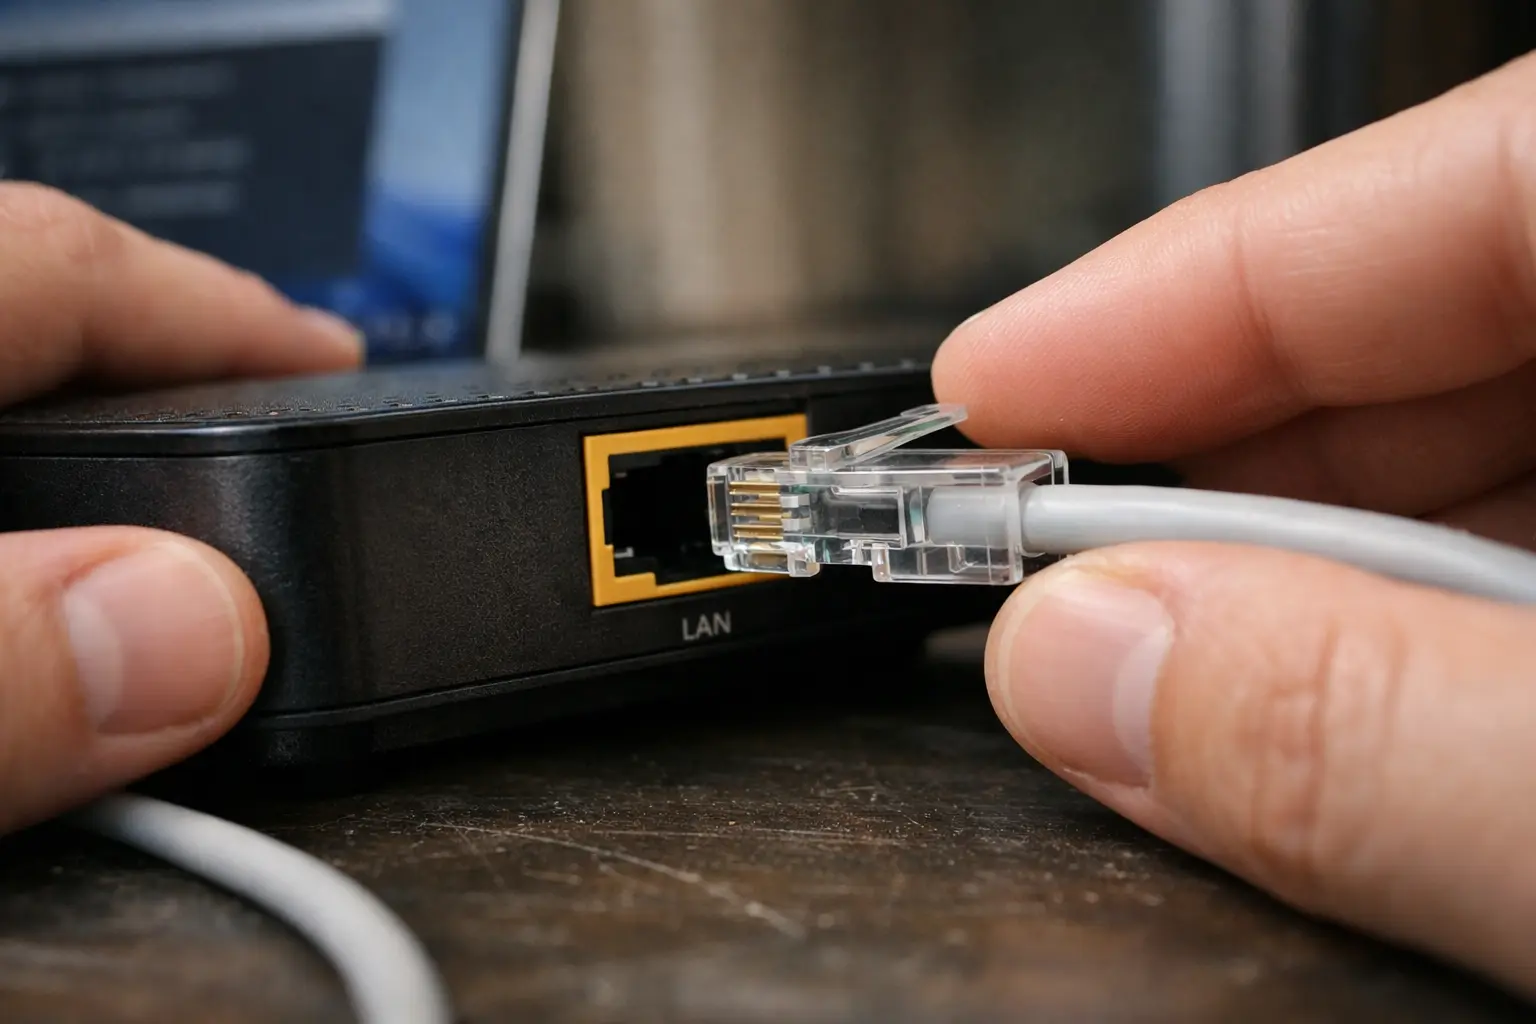
Switch to Ethernet (Biggest Improvement)
If you are currently on Wi-Fi, connecting your PC directly to the router with an Ethernet cable is the single most effective way to reduce latency on Windows 11. Wi-Fi introduces variable delay due to signal interference, channel congestion, and the overhead of wireless protocol negotiation. Ethernet eliminates all of that.
A standard Cat 5e or Cat 6 cable is sufficient for gigabit connections. Plug one end into your PC’s Ethernet port (or a USB-to-Ethernet adapter if your device lacks one) and the other into an open LAN port on your router. Windows 11 will automatically prioritize the wired connection over Wi-Fi.
After connecting, run the continuous ping test again:
ping -t google.comCompare the results to your earlier Wi-Fi test. Most users see latency drop from 30–80ms on Wi-Fi to 5–15ms on Ethernet, with far fewer spikes. If your latency remains high even on Ethernet, the issue lies deeper — either at the router, ISP, or OS level — and you should continue with the remaining fixes.
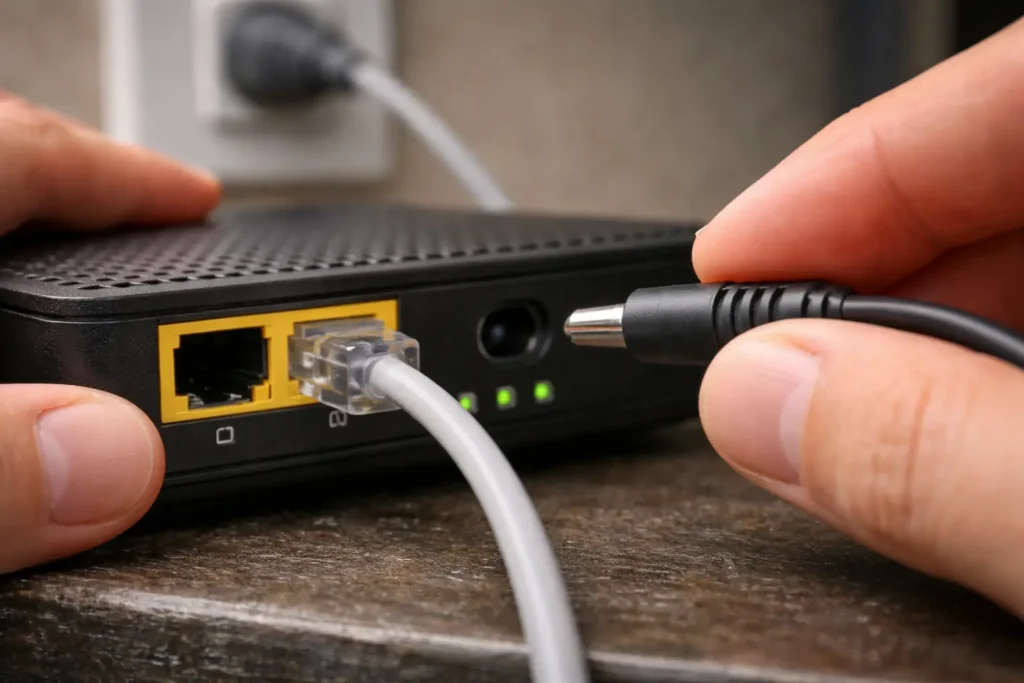
Restart Router + Modem Correctly
A simple restart clears stale connection tables, flushes the router’s DNS cache, and releases accumulated memory. However, most people restart incorrectly by simply toggling the power. The proper sequence matters:
- Unplug the modem (the device your ISP provided) from power. If your modem and router are separate devices, unplug both.
- Wait a full 60 seconds. This allows capacitors to fully discharge and forces the modem to re-establish a fresh connection with your ISP’s network.
- Plug the modem back in first. Wait until all indicator lights stabilize — typically 2–3 minutes.
- Then plug the router back in. Wait another 1–2 minutes for it to fully boot and assign IP addresses.
After the restart, test your latency again. If your router hasn’t been restarted in weeks, this step alone can drop latency by 20–50ms in some cases. For users who notice that internet lags specifically during downloads, the router restart combined with bufferbloat fixes covered later can be especially effective.
Disable Power Management on Wi-Fi Adapter
Windows 11 enables power-saving on Wi-Fi adapters by default, even on desktop PCs where battery life is irrelevant. This setting allows the OS to throttle the adapter during idle moments, which causes brief latency spikes when traffic resumes. Disabling it forces the adapter to stay fully active at all times.
Follow these exact steps:
- Press Windows + X and select Device Manager.
- Expand the Network adapters section.
- Right-click your Wi-Fi adapter (e.g., Intel Wi-Fi 6 AX201, Realtek 8852BE) and select Properties.
- Go to the Power Management tab.
- Uncheck the box labeled Allow the computer to turn off this device to save power.
- Click OK.
While you’re in the adapter properties, click the Advanced tab and look for a property named Roaming Aggressiveness (common on Intel adapters). If present, set it to Lowest. This prevents the adapter from constantly scanning for stronger access points — a process that causes brief disconnections and ping spikes on stable networks.
Additionally, check for a property called Throughput Booster or Packet Coalescing. If either is enabled, set it to Disabled. Packet coalescing bundles multiple packets together to save power, which directly increases per-packet latency.
After making these changes, restart your PC and run another ping test to measure the improvement before moving on to the advanced fixes.
Advanced Fixes for Persistent Latency
If the quick fixes reduced your latency but didn’t fully resolve it — or if your ping remains high even on Ethernet after a router restart — the issue likely involves deeper network configuration. The fixes in this section target bufferbloat, DNS resolution delays, and driver-level problems that Windows 11 doesn’t surface through obvious error messages.
Enable QoS and Fix Bufferbloat
Bufferbloat causes latency to spike specifically when your connection is under load — downloading a game, streaming video, or uploading files while trying to play online. The router buffers excess packets instead of dropping them, creating an artificial queue that inflates your ping from 15ms to 300ms+ until the traffic clears.
The most effective fix is enabling SQM (Smart Queue Management) on your router, if your firmware supports it. SQM actively manages packet queues and prevents the buffer from overfilling. To configure it:
- Log in to your router’s admin panel (typically 192.168.1.1 or 192.168.0.1 in a browser).
- Look for QoS, Smart Queue, or Bandwidth Control under the advanced or traffic management section.
- Enable SQM or fq_codel if available (common on OpenWrt and some ASUS, Netgear, and TP-Link firmware).
- Set your upload and download bandwidth limits to approximately 85–90% of your actual measured speeds. This headroom prevents the buffer from ever reaching capacity.
Not all routers support SQM. If yours doesn’t, consider flashing OpenWrt firmware (for supported models) or upgrading to a router that handles queue management natively. On the Windows side, you can also limit background bandwidth consumption through Settings → Windows Update → Advanced options → Delivery Optimization → Advanced options, where you can cap the percentage of bandwidth that Windows Update uses for downloads.
Change DNS Servers
Your ISP’s default DNS servers are often slow and overloaded, adding 30–80ms of unnecessary resolution time to every new connection your system makes. Switching to a faster, public DNS provider can reduce this overhead significantly.
To change DNS servers on Windows 11:
- Press Windows + I to open Settings.
- Go to Network & internet → Wi-Fi (or Ethernet, depending on your connection).
- Click your active connection, then click Hardware properties.
- Next to DNS server assignment, click Edit.
- Set the toggle to Manual and enable IPv4.
- Enter the following for Cloudflare DNS:
- Preferred DNS:
1.1.1.1 - Alternate DNS:
1.0.0.1
- Click Save.
Alternatively, you can use Google DNS (8.8.8.8 / 8.8.4.4) or Quad9 (9.9.9.9 / 149.112.112.112). After saving, flush your existing DNS cache to force Windows to use the new servers immediately. Open Command Prompt as administrator and run:
ipconfig /flushdnsThis clears all cached DNS entries. You should notice faster page loads and reduced initial connection times in games almost immediately. Users who experience lag during video calls despite fast internet often find that DNS changes combined with bufferbloat fixes resolve the issue entirely.
Update or Reinstall Network Drivers
Generic or outdated network drivers are a persistent cause of high latency on Windows 11, especially after feature updates. Windows Update sometimes installs a compatible but unoptimized driver version that introduces subtle performance issues — higher baseline latency, occasional packet drops, or inconsistent throughput.
First, identify your exact network adapter model:
- Press Windows + X and select Device Manager.
- Expand Network adapters.
- Note the full name of your Wi-Fi or Ethernet adapter.
Now go directly to the manufacturer’s website — not a third-party driver site — and download the latest driver:
- Intel adapters: Download from Intel’s Driver & Support Assistant page.
- Realtek adapters: Download from Realtek’s official download center.
- Killer/MediaTek adapters: Download from the Killer Networking support page.
Before installing the new driver, fully remove the existing one. In Device Manager, right-click your adapter, select Uninstall device, and check the box for Attempt to remove the driver for this device. Click Uninstall, then restart your PC. Windows will load a basic driver on reboot — immediately install the manufacturer’s driver you downloaded.
After installation, restart once more and run your ping test again. For a broader understanding of how driver issues and hardware-level latency interact with network performance, Intel’s guide on reducing latency in gaming provides additional context on adapter-level optimizations.
If latency persists after all these steps, the problem almost certainly lies outside your machine — either ISP-side congestion, routing inefficiency, or the destination server itself. At that point, contacting your ISP with your pathping results gives them concrete data to investigate.

Frequently Asked Questions
What causes high latency on Windows 11?
High latency on Windows 11 is typically caused by a combination of factors rather than a single issue. The most common culprits include Wi-Fi signal instability, background processes consuming bandwidth (Windows Update, OneDrive sync), outdated network drivers, DNS server delays, bufferbloat during heavy traffic, and Wi-Fi power management settings that throttle adapter responsiveness. DPC latency — an internal system processing delay — can also contribute, especially when poorly optimized drivers create hardware-level bottlenecks.
How do I check latency on Windows 11?
Open Command Prompt as administrator and run ping -t google.com for a continuous latency measurement. Let it run for 60–90 seconds to catch both average latency and intermittent spikes. For deeper analysis, use pathping google.com to identify exactly which network hop is introducing the delay — whether it’s your router, your ISP, or the destination server.
Is 40ms latency bad for gaming on Windows 11?
No, 40ms is acceptable for most online games. Competitive shooters like Valorant or CS2 perform best under 20ms, but 40ms is perfectly playable without noticeable input delay. Latency becomes problematic above 80–100ms for fast-paced games. For turn-based or strategy games, even 100–150ms is generally fine. The bigger concern is consistency — a stable 40ms is far better than latency that fluctuates between 20ms and 200ms.
Why do I get high latency only in games on Windows 11?
Game-specific latency usually comes from one of three sources. First, the game server itself may be geographically distant or overloaded — check if the game lets you select a closer server region. Second, Windows may be running background downloads or updates that compete for bandwidth only when you’re actively online. Third, some games use specific ports that your router may be throttling or not prioritizing. Enabling QoS on your router and ensuring no background sync services are running during gameplay typically resolves this.
Does Ethernet fix high latency?
In most home network setups, yes. Ethernet eliminates the variable delay introduced by Wi-Fi signal interference, channel congestion, and wireless protocol overhead. Users commonly see latency drop from 30–80ms on Wi-Fi to 5–15ms on Ethernet. However, Ethernet won’t fix latency caused by ISP congestion, DNS delays, or server-side issues. If your latency remains high on a wired connection, the problem exists beyond your local network.
Can outdated drivers cause high latency on Windows 11?
Yes. After major Windows 11 updates, the OS sometimes replaces manufacturer-optimized drivers with generic Microsoft versions. These generic drivers maintain basic connectivity but often lack performance tuning, resulting in higher baseline latency, micro-disconnections, and inconsistent packet delivery. Downloading the latest driver directly from your adapter manufacturer — Intel, Realtek, or Killer/MediaTek — and performing a clean reinstall is the recommended fix.
How to fix 100ms latency on Windows 11?
A consistent 100ms latency suggests either a Wi-Fi issue, DNS delay, or ISP-side bottleneck. Start by switching to Ethernet — if latency drops below 20ms, your Wi-Fi setup was the problem. If it stays around 100ms on Ethernet, change your DNS servers to Cloudflare (1.1.1.1) or Google (8.8.8.8) and flush your DNS cache with ipconfig /flushdns. Run pathping google.com to check whether the delay appears at your router (Hop 1) or at an ISP node (Hop 2–3). If the ISP hops show the delay, contact your provider with the pathping results as evidence.
Will a VPN reduce latency on Windows 11?
In most cases, a VPN will increase latency because it adds an extra hop — your traffic travels to the VPN server before reaching the destination. However, there are rare exceptions. If your ISP is throttling specific traffic types (gaming, streaming) or using inefficient routing, a VPN can sometimes provide a more direct path to the destination server, resulting in slightly lower ping. This is not reliable or predictable, though. For consistent latency reduction, direct fixes like Ethernet, DNS optimization, and driver updates are far more effective.
Wrapping Up
High latency on Windows 11 is fixable in the majority of cases once you identify where the delay actually originates. Start with a continuous ping test and pathping to establish a baseline. Switch to Ethernet if you’re on Wi-Fi. Disable power management on your network adapter. Change to faster DNS servers. Address bufferbloat through router-level QoS. Update your drivers from the manufacturer — not through Windows Update.
If latency persists after all OS-level and router-level fixes, the issue sits with your ISP or the destination server. In that scenario, your pathping results become your strongest evidence when contacting your provider. Share the hop-by-hop data showing exactly where the delay appears — this moves the conversation past generic troubleshooting scripts and toward an actual infrastructure investigation on their end.