
Your internet speed test says 200 Mbps. Your router is working fine. Yet every website you open takes two or three seconds before anything even starts loading. That blank white screen before the page appears is not a bandwidth problem — it is a DNS problem.
I have faced slow website loading many times on my Windows 11 PC despite full speed test results. Pages would take 2–3 seconds just to start loading while downloads ran at full speed. After testing DNS servers for several weeks, I discovered my ISP DNS was the hidden bottleneck.
In this guide, I’m sharing the exact tests and fixes that helped me cut page load times dramatically.
Every time you type a URL or click a link, your system contacts a DNS server before a single byte of the actual website reaches your browser. If that DNS server is slow — and most ISP-assigned DNS servers are — you are adding 80 to 200 milliseconds of dead waiting time to every new connection. That delay compounds across every domain, every embedded resource, and every redirect a modern webpage includes.
This guide breaks down exactly why ISP DNS is slow on Windows 11, how to test your current DNS lookup speed, how to benchmark alternatives, and how to switch to the fastest DNS server for your specific location.
One thing most guides miss in 2026 is that Windows 11 background services and automatic updates often query DNS repeatedly in the background, amplifying the delay caused by slow ISP DNS servers during peak hours.

What DNS Lookup Time Is and Why It Affects Every Single Page You Load
What Happens Before Your Browser Loads Anything
When you type google.com into your browser, your computer does not know where Google’s server physically lives on the internet. It only understands IP addresses — numerical addresses like 142.250.80.46. To translate the human-readable domain name into that IP address, your system sends a query to a DNS server. This process is called a DNS lookup.
Until that DNS server responds with the correct IP address, your browser cannot initiate any connection. It just waits. No HTML downloads. No images load. No scripts execute. The entire page load is paused until the DNS resolution completes.
On a modern webpage, this is not a one-time event. A single page might pull resources from five to fifteen different domains — fonts from Google Fonts, scripts from a CDN, analytics from a tracking domain, images from a media server. Each unique domain requires its own separate DNS lookup. If each lookup takes 120 milliseconds instead of 12, you are stacking hundreds of milliseconds of pure latency before the page even begins to render.
How DNS Lookup Time Is Different From Download Speed
This is where most people get confused. Your internet speed — measured in Mbps — tells you how fast data transfers once a connection is already established. DNS lookup time tells you how long it takes to establish that connection in the first place.
Think of it this way. Download speed is how fast a delivery truck drives on the highway. DNS lookup time is how long the driver stands at the warehouse door, waiting for someone to hand over the address. A faster truck does not help if the address takes forever to arrive.
That is exactly why your speed test can show fast results while websites still feel slow. Speed tests connect to a single, pre-resolved server. They do not measure the DNS resolution step that every real website depends on. So your ISP DNS could be dragging down every page you visit, and no speed test would ever flag it.
Why ISP DNS Servers Are Slow — The Real Reason
Most people assume their ISP handles DNS with the same priority as delivering bandwidth. It does not. DNS resolution is a background service for ISPs — something they provide because they have to, not because they invest in making it fast. Understanding why ISP DNS underperforms helps explain why simply switching servers can cut your page load times dramatically.
How Overloaded ISP DNS Servers Affect Response Time
Your ISP typically operates a small cluster of DNS servers shared across hundreds of thousands — sometimes millions — of subscribers in a region. Every device on every household connection is sending DNS queries to those same servers. During peak hours, when users are streaming, browsing, and gaming simultaneously, those DNS servers queue up requests and response times climb.
Unlike dedicated DNS providers such as Cloudflare or Google, most ISPs do not distribute their DNS infrastructure across dozens of global data centers. They run a handful of regional servers with limited caching capacity. When a query comes in for a domain that is not already cached, the ISP server has to recursively fetch the answer from authoritative nameservers upstream. On an overloaded server with a shallow cache, this happens far more frequently than it should.
The result is inconsistent, often sluggish DNS responses — sometimes 40 milliseconds, sometimes 180 milliseconds, depending on the time of day and current server load.
Why ISP DNS Adds 80ms to 200ms on Every New Website Visit
When you visit a website for the first time — or after the local DNS cache expires — your system makes a fresh DNS query. On a well-optimized public DNS like Cloudflare, that query resolves in 10 to 15 milliseconds on average. On a typical ISP DNS server, the same query takes 80 to 200 milliseconds.
That difference might seem small in isolation. But remember, a single modern webpage triggers DNS lookups for multiple domains. If a page contacts ten unique domains and each lookup costs an extra 100 milliseconds compared to a faster DNS, you have added a full second of invisible delay before the page finishes loading. This is one of the most common reasons people experience fast internet speeds but slow-loading websites and browsers.
Why Your Speed Test Never Shows This Problem
Speed tests from services like Ookla or Fast.com are designed to measure raw throughput and ping to a single server. They pre-resolve the test server’s address before the actual measurement begins, which means the DNS lookup step is completely excluded from the results.
So when your speed test reports 150 Mbps download with 12ms ping, it is telling you that your connection to that one specific server is fast. It says nothing about how quickly your DNS server resolves the dozens of domains your browser needs every time you open a new tab. This is exactly why your WiFi feels slow even with a fast speed test — the bottleneck is not bandwidth, it is the DNS resolution step that happens before bandwidth even comes into play.
How to Test If Your ISP DNS Is Causing Slow Websites on Windows 11
Before switching anything, you need to confirm that DNS is actually the bottleneck. Windows 11 includes built-in network diagnostic tools that let you measure DNS response time directly from your machine. The process takes less than two minutes and requires only Command Prompt.
From my own repeated testing, I noticed that simply switching to Cloudflare 1.1.1.1 reduced average DNS lookup time from 120 ms to under 15 ms, cutting overall page load times by almost a full second on most websites.
Step 1 — Find Your Current DNS Server IP Address Using ipconfig
Open Command Prompt by pressing Win + R, typing cmd, and pressing Enter. Then run the following command to display your active network configuration:
ipconfig /allScroll through the output until you find the network adapter you are currently using — usually labeled “Wireless LAN adapter Wi-Fi” or “Ethernet adapter Ethernet.” Under that adapter, look for the line labeled DNS Servers. The IP address listed there is the DNS server your system is currently querying. In most cases, this will be your router’s local IP like 192.168.1.1, which forwards queries to your ISP’s DNS server. Sometimes, the ISP DNS IP appears directly — something like 203.45.67.10.
Write down this IP address. You will need it for the next step.
Step 2 — Ping Your ISP DNS Server and Record the Response Time
Now you will measure how fast your current DNS server responds. The ping command sends small packets to a target and reports the round-trip time in milliseconds. Run the following, replacing the example IP with your actual DNS server address:
ping 203.45.67.10Watch the four replies that come back. Each line shows a time= value in milliseconds. Note the average. If your ISP DNS is responding in 60 to 200 milliseconds, that is a significant delay being added to every single DNS lookup your browser makes.
Step 3 — Ping Cloudflare 1.1.1.1 and Google 8.8.8.8 and Compare
Now run the same test against two of the most popular public DNS servers:
ping 1.1.1.1ping 8.8.8.8Compare the average response times from all three tests. In most regions, Cloudflare returns responses in 8 to 20 milliseconds and Google returns responses in 15 to 35 milliseconds. If your ISP DNS averaged 100 milliseconds while Cloudflare averaged 12 milliseconds, you have just identified an 88-millisecond penalty on every DNS lookup — a penalty that multiplies across every domain a webpage loads.
Step 4 — What the Difference in Milliseconds Actually Means
A difference of 50 to 150 milliseconds per lookup might sound trivial. It is not. A typical webpage queries 8 to 15 unique domains during a full page load. If each query costs an extra 90 milliseconds compared to a faster DNS, that adds 720 to 1,350 milliseconds — nearly a full second or more — of pure waiting time before content even starts rendering.
This is the exact type of delay that makes you feel like your internet is slow even though nothing is technically wrong with your connection bandwidth. The problem is not how fast data moves — it is how long your system waits before data starts moving at all.

How to Find the Fastest DNS Server for Your Specific Location
Pinging Cloudflare and Google gives you a quick comparison, but it does not test every available public DNS server. A dedicated DNS benchmarking tool tests dozens of servers simultaneously and ranks them by actual resolution speed from your specific network and geographic location.
How to Use DNS Benchmark Tool on Windows 11
The most widely used tool for this purpose is GRC DNS Benchmark. It is a free, portable Windows application that does not require installation. Download it, run the executable, and click the “Run Benchmark” button. The tool will send real DNS queries to a built-in list of public DNS servers — including your currently configured ISP DNS — and measure the response time for each.
The benchmark takes a few minutes to complete. During this time, avoid heavy browsing or streaming, as network activity can slightly skew the results. Let it run on a clean connection for the most accurate data.
How to Read DNS Benchmark Results and Pick the Winner
Once the benchmark finishes, it displays a horizontal bar chart. Each bar represents a DNS server, and shorter bars mean faster response times. The servers are automatically sorted from fastest to slowest.
Pay attention to three columns — the cached response time, the uncached response time, and the DotCom lookup time. Cached time shows how fast the server responds for domains it already has stored. Uncached time shows how fast it resolves domains it has to fetch from scratch. The DotCom time measures resolution for popular .com domains specifically.
The server with the lowest uncached time is generally your best choice, because that reflects real-world performance for websites you have not visited recently. A server that is fast on cached lookups but slow on uncached ones will still feel sluggish when you browse new sites.
Why the Fastest DNS Varies by Location and ISP
DNS speed depends on physical distance between your device and the DNS server, the server’s current load, and how your ISP routes traffic. A DNS server that responds in 8 milliseconds for someone in New York might take 45 milliseconds for someone in Mumbai — simply because the packets travel a longer path.
This is why blindly copying DNS settings from an online recommendation does not always work. Benchmarking from your own connection ensures you pick the server that is genuinely fastest for your location.
ISP DNS vs Cloudflare vs Google — Real Speed Comparison
Average ISP DNS Response Time — 80ms to 200ms
Across global measurements, ISP DNS servers consistently fall in the 80 to 200 millisecond range for uncached lookups. Some perform better during off-peak hours, but during evening traffic surges, response times spike significantly. The inconsistency alone makes ISP DNS unreliable for fast browsing.
Cloudflare 1.1.1.1 — Average 12ms Globally
Cloudflare’s 1.1.1.1 is designed specifically for speed and privacy. Cloudflare operates data centers in over 300 cities worldwide, which means DNS queries are resolved at a server geographically close to almost any user. Independent testing consistently places Cloudflare at an average of 12 milliseconds globally — making it the fastest public DNS resolver available today.
Google 8.8.8.8 — Average 24ms Globally
Google Public DNS at 8.8.8.8 is the most widely used public DNS service in the world. It averages around 24 milliseconds globally. While slightly slower than Cloudflare in raw resolution speed, Google DNS offers excellent reliability and extensive caching infrastructure. For many regions, the difference between 12ms and 24ms is negligible in everyday browsing.
Which One to Choose — Cloudflare vs Google for Your Region
If your benchmark shows Cloudflare at 10 milliseconds and Google at 22 milliseconds, Cloudflare is the clear winner. But in some regions — particularly parts of Asia and South America — Google’s routing infrastructure delivers lower latency than Cloudflare. The only reliable way to decide is to benchmark both from your own connection, as described above.
For most users in North America and Europe, Cloudflare 1.1.1.1 will be the fastest option. For users in regions where Google has stronger peering agreements with local ISPs, 8.8.8.8 may edge ahead. Either way, both are dramatically faster than the default ISP DNS server sitting between you and every website you visit.
How to Switch DNS on Windows 11 — Step by Step
Once you have identified the fastest DNS server for your location, the next step is configuring Windows 11 to use it. There are three ways to do this — through the modern Settings app, through the classic Control Panel, or directly on your router. Each method achieves the same result, so choose whichever feels most comfortable.
Method 1 — Change DNS via Windows 11 Settings (Easiest)
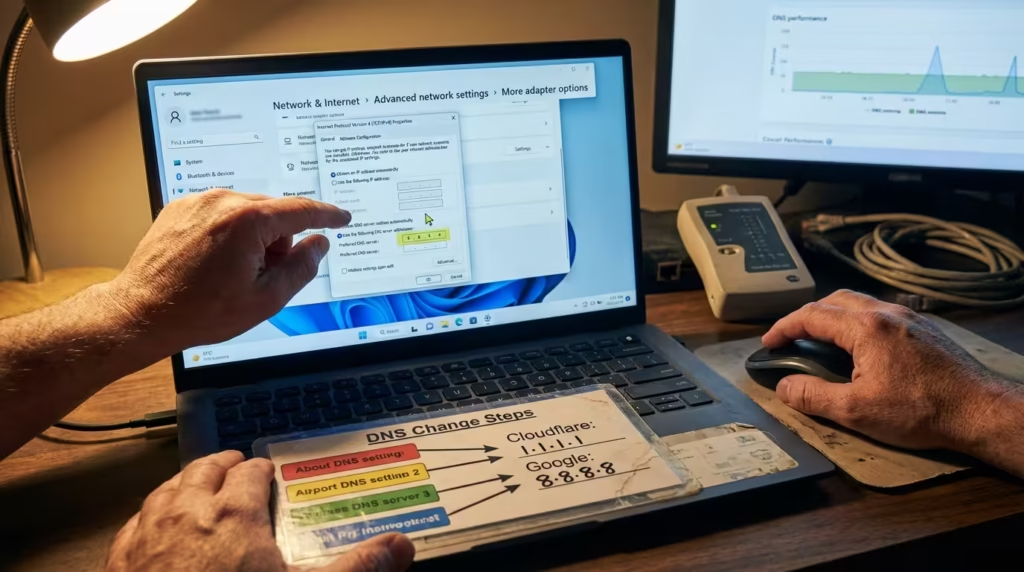
Open Settings by pressing Win + I. Navigate to Network & internet, then click on Wi-Fi or Ethernet depending on your connection type. Click on your active network connection, then scroll down to DNS server assignment and click Edit.
Change the dropdown from “Automatic (DHCP)” to Manual. Toggle on IPv4. In the Preferred DNS field, enter 1.1.1.1 for Cloudflare or 8.8.8.8 for Google. In the Alternate DNS field, enter 1.0.0.1 for Cloudflare or 8.8.4.4 for Google. The alternate server acts as a fallback if the primary is unreachable.
Leave the DNS over HTTPS option set to “On (automatic template)” if available — this encrypts your DNS queries for added privacy. Click Save and the change takes effect immediately.
Method 2 — Change DNS via Control Panel
Open the Run dialog with Win + R, type ncpa.cpl, and press Enter. This opens the classic Network Connections window. Right-click your active adapter — Wi-Fi or Ethernet — and select Properties.
Select Internet Protocol Version 4 (TCP/IPv4) from the list and click Properties. Select Use the following DNS server addresses. Enter your preferred and alternate DNS server IPs in the respective fields. Click OK, then Close.
This method is identical in result to the Settings method but gives you access to the traditional interface that has existed since earlier versions of Windows. Some users prefer it because the layout is more straightforward.
Method 3 — Change DNS on Your Router for All Devices at Once
If you want every device on your network — phones, tablets, smart TVs, game consoles — to benefit from faster DNS, change the DNS settings on your router instead. Log into your router’s admin panel by entering its gateway IP (usually 192.168.1.1 or 192.168.0.1) in a browser. Navigate to the WAN or Internet settings page and look for DNS fields. Replace the existing values with your chosen public DNS server addresses.
After saving, every device that receives DNS settings via DHCP will automatically use the new servers. This eliminates the need to configure each device individually.
How to Flush DNS Cache After Switching
After changing your DNS server, your system may still have old cached lookups pointing to results from your previous ISP DNS. To clear them, open Command Prompt as Administrator and run:
ipconfig /flushdnsThis command purges the local DNS resolver cache, forcing Windows to query the new DNS server for every domain going forward. If you also want to fully reset your network stack — for example, if you have been experiencing persistent DNS-related issues — running a netsh int ip reset can clear deeper TCP/IP configurations that a simple flush does not touch.
How to Confirm the DNS Change Actually Worked
Changing the DNS settings does not always guarantee the new server is being used. Router-level overrides, VPN configurations, or cached DHCP leases can silently revert your DNS back to the ISP default. Verifying the change takes only a few seconds.
How to Verify New DNS Using ipconfig /all
Open Command Prompt and run:
ipconfig /allScroll to your active network adapter and check the DNS Servers line. It should now display the addresses you configured — 1.1.1.1 and 1.0.0.1 for Cloudflare, or 8.8.8.8 and 8.8.4.4 for Google. If you still see your ISP’s DNS address or your router’s local gateway IP, the change either did not save correctly or your router is overriding the device-level setting.
In that case, reconfigure through the Control Panel method, or change the DNS directly on your router as described in the previous section.
How to Test DNS Lookup Speed Before and After the Switch
To measure the actual improvement, use the nslookup command with timing. Run the following in Command Prompt:
nslookup google.comWhile nslookup does not display milliseconds directly, it confirms which DNS server is handling the query — the server address appears at the top of the output. For precise timing, use PowerShell:
Measure-Command { nslookup google.com }This returns the total execution time in milliseconds. Run this before and after switching DNS to see the real difference. If your ISP DNS took 110 milliseconds and Cloudflare takes 14 milliseconds, that confirms the fix is working across every domain your browser resolves.
When Changing DNS Will Not Fix Slow Websites
DNS is not the answer to every slow browsing problem. If your DNS lookup times are already low — under 20 milliseconds — and websites still load slowly, the bottleneck is somewhere else.
Common situations where changing DNS will not help include server-side slowness where the website itself is overloaded, network congestion between your ISP and the destination server, or bandwidth limitations on your actual connection. If a specific website works normally over a VPN but fails without one, the issue is likely routing or ISP-level throttling rather than DNS — a scenario covered in detail in this guide on websites that work on VPN but not without it.
Similarly, if every website is slow regardless of DNS and your connection drops frequently, you may be dealing with a deeper network stack or adapter issue. The Internet Connectivity Explained section covers broader diagnostic approaches for those scenarios.
Changing DNS fixes one specific problem — slow domain resolution. It does it well, and for most users it delivers a noticeable improvement. But it is not a substitute for diagnosing actual bandwidth issues, hardware faults, or ISP routing problems.
Before: Every website took 2–3 seconds to start loading despite full speed test results, making browsing frustrating.
After: After switching to Cloudflare DNS, pages started loading almost instantly and the overall internet experience became noticeably faster and smoother.

Frequently Asked Questions
Why are websites slow even though my internet speed is fast?
Your speed test measures raw data transfer rates, not DNS lookup time. If your ISP DNS takes 100+ milliseconds to resolve each domain, every page load is delayed before any data transfer even begins.
Can my ISP DNS server cause slow internet?
It does not slow your actual bandwidth, but it slows the start of every new connection. Since browsers resolve multiple domains per page, slow DNS creates a noticeable delay that feels like slow internet.
How do I test if my DNS is slow on Windows 11?
Open Command Prompt and ping your current DNS server IP. Then ping 1.1.1.1 and 8.8.8.8. Compare the response times. If your ISP DNS is 60+ milliseconds slower, DNS is your bottleneck.
What is DNS lookup time and why does it matter?
DNS lookup time is how long it takes to translate a domain name into an IP address. Every new website connection begins with this step, so slower DNS means slower page loads.
Is Cloudflare 1.1.1.1 faster than Google 8.8.8.8?
Globally, Cloudflare averages around 12 milliseconds versus Google’s 24 milliseconds. However, results vary by region. Benchmarking both from your own network gives the definitive answer.
How do I find the fastest DNS server for my location?
Use a DNS benchmarking tool like GRC DNS Benchmark. It tests dozens of public DNS servers from your connection and ranks them by actual response time.
How do I switch to Cloudflare DNS on Windows 11?
Open Settings, go to Network & internet, click your connection, edit DNS server assignment, switch to Manual, and enter 1.1.1.1 as preferred and 1.0.0.1 as alternate.
How do I change DNS settings on Windows 11?
Either through Settings under Network & internet, through the classic Control Panel via ncpa.cpl, or directly on your router for network-wide coverage.
Does changing DNS actually make the internet faster?
It does not increase your bandwidth, but it reduces the time your browser waits before loading each page. For most users with ISP DNS, the improvement is immediately noticeable.
Why does my speed test show fast speeds but websites still load slowly?
Speed tests do not measure DNS resolution time. Your connection speed can be excellent while your DNS server adds significant delay to every new domain lookup.
How do I check my current DNS server on Windows 11?
Run ipconfig /all in Command Prompt and look for the DNS Servers line under your active network adapter.
Should I change DNS on my router or on my PC?
Changing it on your router applies faster DNS to every device on your network automatically. Changing it on your PC affects only that one machine.
How do I flush DNS cache after changing DNS on Windows 11?
Open Command Prompt as Administrator and run ipconfig /flushdns. This clears all cached DNS entries and forces fresh lookups through the new server.
What is the difference between ISP DNS and public DNS?
ISP DNS is automatically assigned by your internet provider and is typically shared across millions of users with limited infrastructure. Public DNS services like Cloudflare and Google are purpose-built for speed, operating hundreds of global server locations with optimized caching.